Your cart is currently empty!
New Facebook Comment form for Blogger/Blogspot Blogs( reply & notifications enabled)
UPDATE: Check the new way of adding Facebook comment plugin to Blogger blogs here.
In one of my previous posts, I shared with you, How to add Facebook Comment Form to Blogger Blogs (Template Designer layouts inclusive). As at the time of publishing this post, Facebook has upgraded the comment form with the “reply” option, while also enabling the admin to receive facebook notifications anytime comments are made on blogs via the facebook comment form. Hence, today, I will explain to you how to add the new facebook comment form to blogger/blogspot blogs.
In this tutorial, it is not compulsory you disable your blogger comment form but I will advise you to back up your blogger template before carrying out this installation.
Recommended: New Way of Creating Facebook Application
STEP 1: Visit Facebook developer page .
You might be asked to verify your account, choose any of the verification options to complete the verification.
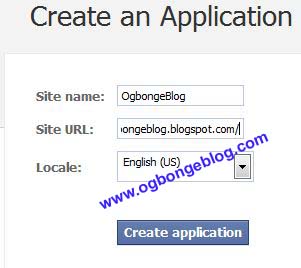
Thereafter you will see a small form, enter your blog name ( you can type any name ).
Then, enter your blog url with an ending slash in Site URL (for example: ogbongeblog.blogspot.com/) and click on “Create application”.
Don’t forget to put the “/” sign at the end of your blog url as indicated in the picture below.
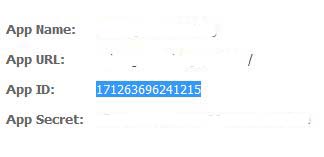
If successful, you should then see a page displaying your application info. Now copy the App ID as indicated in the picture below and save it in a notepad.
STEP 2: Log in to you Blogger dashboard and navigate to Template > Edit HTML. Click inside the HTML editor and use “CTRL+F“, to search for the code <body and paste the code highlighted below directly under it and save the template.
<div id=”fb-root”></div><script src=”http://connect.facebook.net/en_US/all.js#appId=141084445958514&xfbml=1″></script>
Replace the APPID in the code above with your APP ID provided from Facebook which you copied in Step 1 and save the template.
After adding the code, your code should now look like:

STEP 3: Still in Template > Edit HTML, use “CTRL+F“, to search for the code <data:post.body/> and paste the “comment form code” highlighted below directly under <data:post.body/> and save the template.
<b:if cond=’data:blog.pageType == "item"’>
<p align=’center’><a href=’https://www.ogbongeblog.com’><img alt=” class=’icon-action’ src=’http://2.bp.blogspot.com/_B1aAP3Dld_s/TQMw8AEVE3I/AAAAAAAAAdU/m3jMAe8aMko/s320/commentpix.png’/></a></p>
<fb:comments expr:href=’data:post.url’ numposts=’10’ width=’500’/>
</b:if>
You can adjust the WIDTH too to any size you want (the 500 is ok).
SAVE your template and view one of the POSTS on your blog. You should see the comment form.
NOTE:
In this tutorial, I have used the <b:if cond=’data:blog.pageType == "item"’> conditional tag to restrict the comment form to the post pages. Hence, you might not see it on the Homepage and also on PAGES but you will definitely see it under your blog posts.
If u remove the <b:if cond=’data:blog.pageType == "item"’> conditional tag together with it’s </b:if> closing tag from the comment form code above, then, the form will appear on all pages of your blog and also on the homepage.
That’s all. SAVE your template and view your blog. You should see the comment form.
So, How about the Notifications?
You will need to add some codes to your blog html so you can be receiving facebook notifications and also to be able to moderate the comments.
So, Login to you Blogger dashboard and navigate to Layout > Edit HTML and tick the small “Expand Widget Templates” box. Using “CTRL+F“, search for the code <b:skin><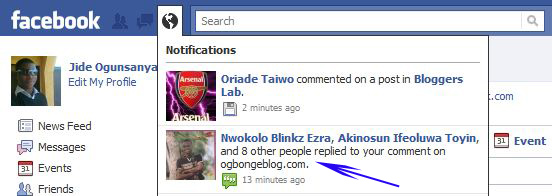
So, How Do I Moderate and Reply to Comments?
Whenever you want to moderate your comments, just go to : http://developers.facebook.com/tools/comments
You can bookmark it for easy access. You can also easily be replying comments from the page.
What If I want to hide Blogger’s comment form?
If you want to Hide the Blogger’s comment form; go to: Settings > Comments > Comments, and mark the Hide radio-button and click on “Save Settings”.

I hope this info helps…
If it works for you, kindly use the comment form to share the link to your blog, so we can check it out.
For more info on the features of the new facebook comment form, check out:
http://www.strictlyonlinebiz.com/blog/top-facebook-comment-box-features/2088/
In my future posts, I will share with you, how you can add the Facebook “Recommend button“, “Login button” , “Like Box” etc to your blogger blog. So, SUBSCRIBE to this blog now if you don’t want to miss them, even if I post them here, when you are not online.
Cheers!
Like What You Read?
Sign Up to get similar articles delivered to your email inbox.
15 responses to “New Facebook Comment form for Blogger/Blogspot Blogs( reply & notifications enabled)”
-
hmmm but I suggest using http://disqus.com/ a damn good comment system me too using it on my site it automatically replaces the blogger comment system and gives so many options to comment like facebook,twitter,openid,yahoo,google,free to use simple to signup and one click to install
-
This is so impressive and use full post. I like this good and new face book knowledge. Thanks share this good topic at this site.
-
Yes, really nice to hear form you guys. I appreciate this work. This post is really useful for everyone. I look forward more post from you. Thanks.
-
Yes. Nice. But for novices like us (me) fidlling with these codes some times gets one mad. Still working on mine. Nice post. http://hotgrid.blogspot.com/
-
@Neeraj.. I will try it one of these days… @Seo, Joomla..thx for stopping by @Ify.. Pls, dont let it get you mad. Just relax and follow the steps. Once you learn it, it will become part of you bro. Your blog is ok.You have good content there.
-
thanks for info, I've applied and managed. yeah, I'm from Indonesia terima kasih
-
Commenting was such a huge blessing to me when I first started blogging. I learned a whole lot about social media and blogging from a lot of people.
Connected with you on your blog Robert. Excited to read more!
-
Hi! I used your codes and worked well but there is one problem I have that I need you to guide me & fix it. Every comment made by my visitors, it doesn't notify me in my facebook account. I have placed my FB ID which is my ID for my FB Page profile. Please help me ASAP my site is vhivelivetv.info, and contact me at my email, thanks!
-
i am searching this tip thanks its working my blog
-
This is such a nice article. But I am little afraid of loosing Google attention when I apply facebook comment box to my blog.
-
hy jide, i tired registering on d fb developers page but it didnt bring me to the app id page
Facebook DevelopersDocumentationSupportBlogApps
Recently ViewedNo Apps Found
Apps
Create New App
Welcome to the Developer App.
Learn how to build a social experience by referring to the documentation below, or create an app by clicking on the 'Create New App' button above.
Websites
Using Facebook on your Website allows you to create a more personalized, social experience using Social Plugins such as the Like Button and simplifies your registration and sign-in process using Login Button and Registration Plugin
Apps on Facebook
Building an app on Facebook gives you the opportunity to deeply integrate into our core user experience. Use native Facebook functionality such as Requests and Bookmarks to create an ideal social space for your users.
Mobile Apps
Facebook Platform makes iOS (iPhone & iPad), Android and Mobile Web apps social. Use Single Sign-On to access the user's social graph (without yet another username/password) and create a personalized experience.
Samples & How-Tos
Our samples and how-to guides are a great way to get started with Facebook Platform. Adding social to your app has never been easier.
Facebook © 2011 · English (US)
AboutPlatform PoliciesPrivacy Policy-
just point your browser to http://www.developers.facebook.com/apps and create new app
-
-
you have to click on the CREATE A NEW APP link and follow the steps bro
-
I did everything as explained here but the facebook comment didn't show on my blog. Check here techblogng.com. Looking forward to reply on this.
-
Thanks for the tutorial bro. Added it on the desktop view on my blog.


Leave a Reply